By now, you've probably seen and tried various Photon applications -- the window manager, Helpviewer, games, and so on -- and you're ready to develop your own. This chapter introduces you to the basic terms and concepts that you'll use when developing a Photon application.
It includes:The Photon manager runs as a small server process, implementing only a few fundamental primitives. It creates a three-dimensional event space populated by regions and events. This manager can't draw anything or manage a mouse, keyboard, or pen.
External, optional processes -- including the device drivers, and window and other managers -- implement the higher-level functionality of the windowing system. They communicate by emitting events through the Photon event space.
A Photon application consists of one or more flat, rectangular regions that act as its "agents" in the event space. The application draws inside the regions. Regions are stacked on top of each other in the Photon event space. A region can have a parent region as well as siblings.
The user sits outside the event space, looking in from the front. The very back of the event space is a special region called the root region.
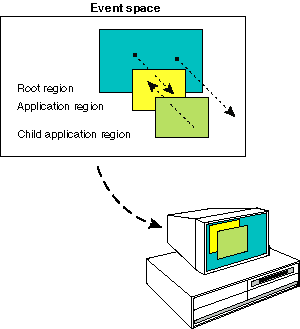
Photon's event space from the user's perspective.
When you run the application, you interact with it, and it interacts with other applications and Photon, in many ways:
These interactions are called events, and they travel between regions in the event space like photons or particles of light. For example:
Each region can determine which events it's interested in by setting its sensitivity and opacity:
For more information, see the Photon Architecture appendix.
The Photon microGUI includes a very powerful development tool called the Photon Application Builder (abbreviated as PhAB or AppBuilder). It's a visual design tool that generates the underlying C and/or C++ code to implement your application's user interface. With PhAB, you can dramatically reduce the amount of programming required to build an application. You can save time not only in writing the user interface portion of your code, but also in debugging and testing. PhAB helps you get your applications to market sooner and with more professional results.
| If you're using the Windows-hosted version of PhAB, you should read the appendix, Using PhAB under Microsoft Windows. |
PhAB takes care of designing and creating modules (e.g. windows, menus, dialogs, and icons, and widgets (e.g. buttons and labels). It also helps you create widget callbacks, special resources that connect a widget to your application's code or link a widget to a PhAB module. For more information, see "Widget concepts," later in this chapter.
PhAB lets you access and create PhAB modules within your own code. It also provides a number of utility functions to set up databases of widgets that you can reuse as many times as you need, rather than create widgets from scratch.
PhAB lets you bypass the trial-and-error process of creating a user interface by hand. Instead of having to write code for every button, window, and other widget, you just "point and click" to create the widgets you want.
As soon as you create a widget, PhAB displays it on the screen, along with all the resources that control how the widget looks and behaves. Changing any widget resource is easy -- just click on the resource, choose a new value, and you're done. It's just as easy to move or resize a widget -- simply point to the widget and drag with the mouse.
Like other Graphical User Interface (GUI) development environments, PhAB lets you attach code functions to a widget's callbacks so you can implement your application's main functionality. For example, you can attach a code function to a button so that the function is invoked whenever the user clicks on the button.
In addition, PhAB doesn't force you to write and attach the code needed to "glue" the different parts of your interface together. Instead, you can attach a widget's callbacks directly to any window, dialog, or menu. The only code you have to worry about is the code specific to your application.
Once you've completed any part of a user interface, you can have PhAB generate all the C and/or C++ code required to bring the interface to life. Which means you can create a complete prototype without having to write a single line of code.
After you've generated and compiled the code, you can run the prototype to see how the interface works. For example, if you link a button to a dialog, clicking on the button causes the dialog to pop up. You immediately get a sense of how the interface will "feel" to the user. In fact, PhAB makes the process of building and testing so efficient that you can even sit down with your users and design prototypes together.
After you've finished a prototype, you can build it into your working application. Or you can stop prototyping at any point, write some callback functions, experiment with your application to see how it works, and then return to prototyping. You're always free to fine-tune all aspects of your application until it looks and works just the way you want.
Your application may need to use the same widgets in several parts of its interface. With PhAB, you don't have to set up these widgets every time they're needed. Instead, you define the widgets just once, place them in a widget database, and then, using C functions provided by PhAB, reuse the widgets as often as you want. By taking this approach, you can reduce the code required to create a widget to a single line.
With PhAB, you rarely have to build an application from scratch. For example, if you've already created windows and dialogs for an existing application, you're free to drop these into a new application. You can also create a central database of widgets that you import into all your applications to create a consistent look and feel.
With PhAB, you can speed up development without compromising functionality. So you're free to create all kinds of applications. For example, we used PhAB to build almost all the applications that ship with Photon, including the Helpviewer, Terminal application, Desktop Manager, Snapshot, all games and demos -- even PhAB itself!
The best introduction to PhAB is using it, so start by working through the tutorials. Within a very short time, you'll be able to put together very detailed prototypes. When you're ready to start programming your application, you can then read the sections pertaining to the widgets you're trying to use.
We provide complete source code for all the demos and games built with PhAB. You can load any of them into PhAB and review them for ideas within your own applications. The Video Poker application is a good example that uses most of PhAB's features.
When creating a new user interface (UI), it's much simpler to compose the interface from a set of standard components, such as sliders, lists, menus, and buttons, than to implement each UI element from scratch. Each standard component included in the UI is an object called a widget.
Photon widgets implement a set of UI components that are more or less consistent with other windowing systems that you may have seen.
The widget set is built on an object-oriented framework loosely based on the X Toolkit Intrinsics library (Xt). If you're already familiar with Xt, you'll see that many of the same concepts apply here.
A widget combines the data and operations required to implement a particular UI element. Grouping data and operations into an object like this is called encapsulation. A widget encapsulates the knowledge of how to:
In addition, there are some widgets called containers that hold other widgets and manage their layout.
A widget also hides the details of how it performs these responsibilities from the outside world. This principle, known as information hiding, separates the widget's internal implementation from its public interface.
The public interface consists of all the attributes visible to other objects as well as the operations other objects may perform on the widget. The attributes in the widget's public interface are called resources.
| The advantage to you as a programmer is that you don't have to know the implementation details of a widget to use it -- you just need to know the public interface for the widget, how to create and destroy the widget, and how to manipulate its resources. |
Not every object is unique. Objects that perform the same function and provide the same public interface belong to the same class. Widgets that provide the same UI component belong to the same widget class. The window's class methods implement the common functionality by the class.
Several widget classes may have attributes and operations in common. In such cases, these widget classes may be categorized as subclasses of the same superclass or parent class. The attributes and operations are encapsulated in the superclass; the subclasses inherit them from the parent class. The subclasses themselves are said to be inherited from the superclass.
The Photon library allows a widget class to be inherited from only one widget class. This relationship is known as single inheritance. The relationships between all of the widget classes can be drawn as a tree known as the class hierarchy.
If your browser supports image maps, you can select a widget from this diagram:
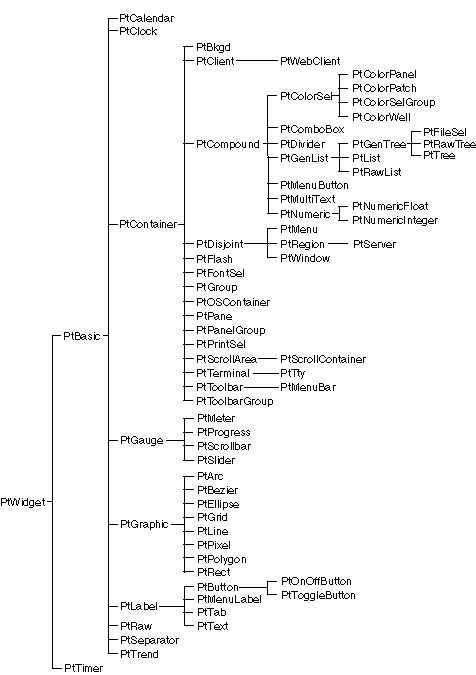
The Photon widget hierarchy.
The nesting of widget instances in your application's GUI produces another widget hierarchy, called the widget family to distinguish it from the widget class hierarchy.
The Photon widget library acts like a widget factory. It provides a set of functions that allow the programmer to create a new widget of a particular widget class and then manipulate that widget. Once created, the widget has all the characteristics of the widget class. Because of inheritance, it also has all the characteristics of the superclasses of its widget class.
The new widget is an instance of the widget class. Creating a new widget of a particular class is thus also called instantiating the widget. This term isn't entirely accurate, however, because you're really instantiating the widget class. This reflects a tendency found throughout this guide to refer to both widgets and widget classes simply as "widgets."
The widget's resources are used to configure its appearance or behavior. You can edit resources in PhAB, and after the widget has been created you can change many of them with a call to PtSetResource() or PtSetResources(). Resources are used extensively to control the data displayed by a widget and to customize how it's displayed. For example:
| The way that you get and set widget resources in your application code depends on the type of resource. For more information, see the Manipulating Resources in Application Code chapter. |
An important type of resource provided by widgets is the callback list, which is a list of functions that the widget invokes in response to some significant user event. For example, a text field widget calls the functions in one of its callback lists whenever the user enters a new value and presses Enter. When you develop an application, you can add callbacks to a widget's callback list in order to perform the appropriate action in response to a user event.
For more information about adding callbacks, see:
A widget has an inherent life cycle, as shown below.

Life cycle of a widget.
Realizing a widget automatically realizes all its descendants. Photon guarantees that all the descendants are realized before the widget itself, so the widget can calculate its initial size based on the sizes of its children. You may choose to have the application notified that the widget has been realized, by registering a callback on the Pt_CB_REALIZED callback list.
You can destroy a widget by calling PtDestroyWidget(). The call doesn't actually destroy the widget immediately -- it's marked to be deleted by the toolkit at an appropriate time and added to a list of widgets to be destroyed. These widgets are normally destroyed within the main loop of the application, after all the callbacks associated with an event have been invoked.
Your application can define Pt_CB_DESTROYED callbacks for any widget. These callbacks are invoked when the widgets are marked for destruction.
You can choose to have the application notified when the widget is actually destroyed by registering a function with the destroy callback list (Pt_CB_IS_DESTROYED) for the widget. This is especially useful for cleaning up data structures associated with the widget.
You can think of a widget as a painting or mounted photograph. The widget is held by a frame called a border. For a widget, the border is the set of outlines and the beveled edge that may be drawn around the outside.
The part of a widget that's used for drawing is called the canvas. For PtWidget, this is the area inside the widget's borders. For PtBasic and its descendants, the canvas is the area inside the widget's border and margins. Other widgets, such as PtLabel, define other margins. The margins that form a matt and obscure any part of the canvas extending beyond the cut-out area. This cut-out region is sometimes referred to as the clipping area.
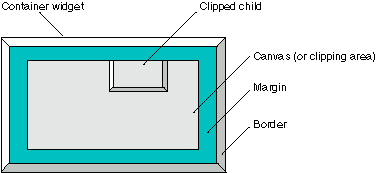
Anatomy of a PtBasic widget.
| The canvas and margins are shown in different colors in the above diagram for the sake of clarity. In an actual widget, they're the same color. |
For a widget, the border is optional. It's drawn only if the widget is highlighted (i.e. has Pt_HIGHLIGHTED set in its Pt_ARG_FLAGS resource). The border consists of various optional components, depending on the settings of the widget's Pt_ARG_BASIC_FLAGS resource. The components, from the outside in, are:
A widget has several important attributes that define the geometry of these elements. The dimension of the widget, Pt_ARG_DIM, is the overall size of the widget, including its borders:
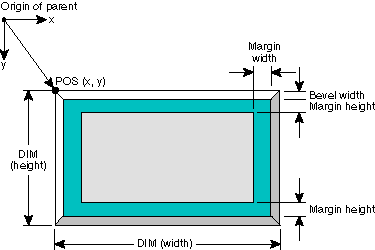
Widget position and dimensions.
Pt_ARG_MARGIN_WIDTH defines the width of the margins on the left and right of the canvas, and Pt_ARG_MARGIN_HEIGHT defines the height of the margins above and below the canvas. These resources are defined by PtBasic.
Other widget classes define their own margin resources, which may be added to the basic margin width or height. For example, the label widget provides separate margins for the left, right, top, and bottom of the widget. These are added to the basic margin width and height to determine the amount of space to leave on each side of the canvas.
The origin of the widget (for the purposes of any drawing it performs or positioning of any children) is the upper left corner of the canvas. All coordinates specified for the widget are relative to this location, as are the coordinates of all events that the widget receives. For example, if the widget is a container, the positions of all the children are relative to this point:
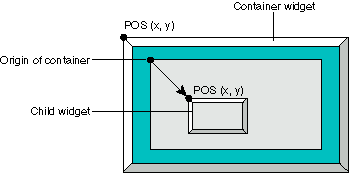
Origin of a widget and the position of its children.
For positioning children, containers are concerned with only the outside edges of the widget's border. The position of the widget is maintained by the Pt_ARG_POS resource. This position is the point at the upper left corner of the outside of the widget's border. A container positions its children by adjusting this resource.
The position and dimensions of the widget can be accessed or modified simultaneously using the Pt_ARG_AREA resource provided by the widget.
The extent of a widget is a rectangle defined by the widget's position and dimensions. It isn't normally calculated until the widget is realized; you can force the widget to calculate its extent by calling PtExtentWidget(); to force a widget and its children to calculate their extents, call PtExtentWidgetFamily(); Once the extent is calculated, you can find out what it is by getting the Pt_ARG_EXTENT resource, or by calling PtWidgetExtent().
Let's compare how you write a text-mode application, a non-PhAB (Photon) application, and a PhAB application.
When you write a non-Photon (text-mode) application, you generally concentrate on the main program, from which you do such things as:
Structure of a text-mode application.
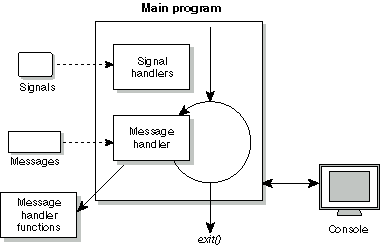
A Photon application written without PhAB is similar to a text-mode application, except that you also:
Usually one of your callbacks exits the application. Writing an application without PhAB means you'll be working directly with the widgets -- a lot.
Structure of a Photon application written without PhAB.
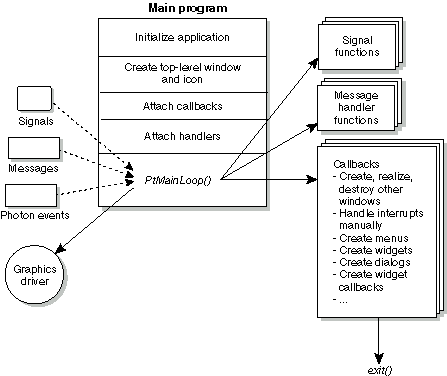
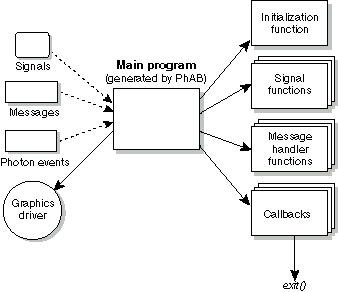
When you develop a PhAB application, the main program is provided for you. Instead of worrying about the main program, you:
The main program loops forever, processing events as they occur. Usually one of your callbacks ends the application. PhAB handles a lot of the details for you -- you'll concentrate on your application's functionality, not the widgets'.
Structure of a Photon application written with PhAB.
In addition, you don't have to size and position widgets from your code; you do it visually in PhAB. PhAB also looks after instantiating, realizing, unrealizing, and destroying your widgets. PhAB even provides a menu module to make creating menus easy. You can see why we recommend using PhAB!
The Photon application programming interface (API) is arranged into sets of functions, each distinguished by a two-character prefix:
The functions and data structures in these libraries are described in the Photon Library Reference.
The Pd, Pf, Pg, Ph, Pi, Pm, Pp, Pt, Rt, utf8, and wc routines are in Photon's main library, ph. Routines that are used to rasterize the Photon draw stream are in the phrender library. The ph, phrender, and Ap libraries are available in shared and static forms.
You may want to link your applications with the shared libraries; doing so makes your application much smaller. For more information, see "Choosing the libraries" in the Generating, Compiling, and Running Code chapter.
| The shared ph library doesn't include anything that requires floating-point operations (currently just the PtNumericFloat widget). The static version does. |
The Al and Px routines are included in the extended library, phexlib, which is available only in static form.
| The photon library is for applications created with version 1.14 of the Photon microGUI only. Don't combine this library with the current libraries or header files, or your application won't run properly. |
To construct an application UI in PhAB, you start with primary building blocks called modules. Modules look and work a lot like the windows you see in most Photon applications.
You could design a UI with just one module. But for most applications, you'll probably use several modules and assign each a different role. As a rule, each module groups together related information and lets the user interact with that information in a specific way. To help you handle the requirements of virtually any application, PhAB provides several module types:
For more information, see the Working with Modules chapter.
Once you've created a module, you're ready to place widgets into it. To add a widget, just click on the appropriate icon in PhAB's widget palette, then click where you'd like the widget to go. PhAB lets you add any widget that comes with the Photon development environment. You can choose from widgets that:
To customize how a widget looks and works, you set its attributes or resources. PhAB's Control panels and Resource editors make it easy to do this. Just click on the resource you want to change, then select or enter a new value.
You can event customize a widget and then save it as a template to use to create similar widgets.
For more information, see the Editing Resources and Callbacks in PhAB chapter.
You've created your modules and placed widgets into them. Now you're ready to define how the application works. To do this, you use callbacks.
Every Photon widget supports several callback types. To attach code functions to a callback, you set a resource or use a provided convenience function. The widget invokes the code function whenever the callback's conditions are met.
With PhAB, you're free to concentrate on writing application-specific code in your callbacks -- you don't have to create code to "glue" interface components together. That's because PhAB provides a level of callback called the link callback. Using link callbacks, you can attach a widget's callback resource directly to windows, dialogs, menus, and many other things besides application code.
Link callbacks also let you add functionality that isn't available when you attach callbacks "by hand." For example, if you link a dialog to a button widget, you can specify where the dialog is to appear. You can also specify a setup function that's automatically called before the dialog is realized, after the dialog is realized, or both.
The extended functionality provided by link callbacks makes it much easier to design a user interface. In fact, you can prototype an entire application without having to write any code.
For more information, see the Editing Resources and Callbacks in PhAB chapter.
You've created your application's modules and created the link callbacks to glue the various components together. Now you're ready to generate and compile code to turn your application design into a working executable.
To do this, you open PhAB's Build + Run dialog and just click on a few buttons. That's it. This dialog includes a file manager so you can also edit source code and manipulate files -- without having to leave the PhAB environment.
For more information, see the Generating, Compiling, and Running Code chapter.
After you've generated, compiled, and linked your application, you can execute it right from the Build + Run dialog. Using this same dialog, you can even launch your application under a debugger for seamless debugging.
For more information, see the Generating, Compiling, and Running Code chapter.
After you've generated and compiled your application, you're free to change the interface, attach callbacks, and regenerate the code as often as you like.
We recommend that you use PhAB to develop your application. However, even if you don't plan to use PhAB, you should read through this guide completely (especially the Programming Photon without PhAB chapter) in order to familiarize yourself with all the Photon fundamentals before you can start creating applications. You should then refer to the Widget Reference.