As the manual for the Embedding SDK package, Building Embedded Systems is intended for developers who are building embedded systems that will run under the QNX realtime operating system.
| The QNX RTOS runs on several processor families (e.g. PowerPC, MIPS, ARM, SH-4, x86). For information on getting started with QNX on a particular board, refer to the appropriate BSP (Board Support Package) documentation for your board. |
This guide is organized around these main topics:
| Topic | Chapter |
|---|---|
| Getting the big picture | Ch. 1: Overview of Building Embedded Systems |
| Making an image | Ch. 2: Making an OS Image |
| Preparing your target | Ch. 3: Writing an IPL Program Ch. 4: Customizing Image Startup Programs Ch. 5: Customizing the Flash Filesystem Appendix B: Sample Buildfiles |
| Dealing with hardware issues | Appendix A: System Design Considerations |
This guide also contains a glossary of terms used in the QNX docs.
| We assume that you've already installed QNX and that you're familiar with its architecture. For a detailed overview, see the QNX System Architecture manual. |
When you install a BSP package, the source is put into a processor-specific directory under the /usr/src/bsp-6.1.0 directory. BSP kits are packaged and distributed by processor family. The currently supported processor families are PPC, MIPS, ARM, SH and x86.
For example, if you install the PowerPC BSPs, the directory structure looks like this:
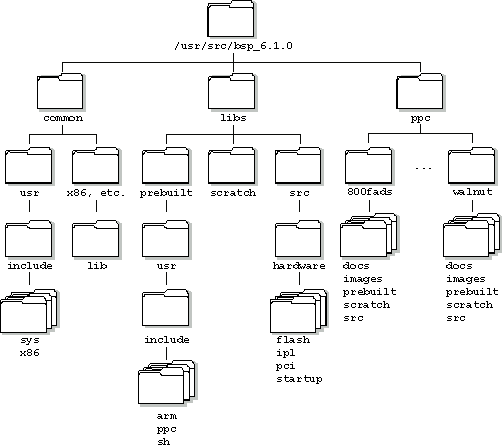
Directory structure for Board Support Packages for PPC.
BSPs are initially installed such that they'll build only if you have root permissions.
| Before working with the source code, login as the user who will be working on the source, and copy it to a working location. This user will then have the appropriate permissions to build the code. Check the source into your source-control system, if you're using one. |
Under QNX 6, use the -D and -r options to the cp command to copy all of the source. For example:
cp -Dr /usr/src/bsp-6.1.0 /home/myId/my_BSPs
Under Windows and Solaris, use the -r option:
cp -r /usr/src/bsp-6.1.0 /home/myId/my_BSPs
Each BSP is rooted in whatever directory you copy it to. If you type make within this directory, you'll generate all of the buildable entities within that BSP no matter where you move the directory.
| Our documentation calls the top-level directory for a BSP (e.g. /home/myID/my_BSPs/ppc/walnut) the bsp_working_dir. |
BSPs are structured so that typing make or make install doesn't affect the host system. All binaries are placed in a scratch area within the BSP directory that mimics the layout of a target system.
There's a common directory installed under the /usr/src/bsp-6.1.0 directory that all of the BSPs use. This directory contains common header files that aren't part of the standard product, and private libraries that the individual BSPs might need.
When you build a BSP, everything it needs, aside from standard system headers, is pulled in from within its own directory. Nothing that's built is installed outside of the BSP's directory. The makefiles that are shipped with the BSPs accomplish this by copying the contents of the prebuilt directory into the scratch directory, and then building with the scratch directory in the list of directories searched for include files and linkable libraries.
A similar method is used to make the scratch directory the target for make install. Binaries built by the BSP are installed in the scratch directory in a location that mimics where the binary should be installed in a running system.
BSPs that ship with driver components require that you build the driver component within the appropriate location in the corresponding Driver Development Kit (DDK). Network, graphic, audio, and other drivers are installed in the /usr/src/ddk-6.1.0 directory as though you'd installed the corresponding DDK. You can install a DDK after you've installed the driver source that uses it, and it will still build properly. For further information on working with driver DDKs, refer to the technotes and documentation for the DDKs.
If you plan to use the Photon microGUI in your embedded system, refer to the appendix "Photon in Embedded Systems" in the Photon Programmer's Guide.
In QNX documentation, we use a forward slash (/) as a delimiter in all pathnames, including those pointing to Windows files.
We also generally follow POSIX/UNIX filesystem conventions.