Breakpoints
This chapter discusses how to use breakpoints so you can stop your program to examine its code or data. It includes sections on the following:
- the definition of a breakpoint
- how to use breakpoints
- Break menu
- Break window
- Breakpoint dialog
What's a breakpoint?
The Watcom Debugger uses the single term breakpoint to refer to the group of functions that other debuggers often call breakpoints, watchpoints, and tracepoints.
A breakpoint is traditionally defined as a place in your program where you want execution to stop so that you can examine program variables and data structures. A watchpoint causes your program to be executed one instruction or source line at a time, watching for the value of an expression to become true. Don't confuse a watchpoint with the watch window. A tracepoint causes your program to be executed one instruction or source line at a time, watching for the value of certain program variables or memory-referencing expressions to change.
In the Watcom Debugger:
- Break-on-execute refers to the traditional breakpoint
- Break-on-write refers to the traditional tracepoint
- A traditional watchpoint is a break-on-execute or break-on-write coupled with a condition
The Watcom Debugger unifies these three concepts by defining three parts to a breakpoint:
- the location in the program where the breakpoint occurs
- the condition under which the breakpoint is triggered
- the action that takes place when the breakpoint triggers
You can specify a countdown, which means that a condition must be true a designated number of times before the breakpoint is triggered.
When a breakpoint is triggered, several things can happen:
- program execution is stopped (a breakpoint)
- an expression is executed (code splice)
- a group of breakpoints is enabled or disabled
In this chapter, you'll learn about the breakpoint, including how to set simple breakpoints, conditional breakpoints, and breakpoints that watch for the exact moment when a program variable, expression, or data object changes value.
How to use breakpoints during a debugging session
Setting simple breakpoints
When debugging, you often want to set a few simple breakpoints to make your program pause execution when it executes certain code. You can set or clear a breakpoint at any location in your program by placing the cursor on the source code line and selecting Toggle from the Break menu or by clicking on the button to the left of the source line. You can set breakpoints in the assembly window in a similar fashion. Setting a break-on-write breakpoint is equally simple. Select the variable with the right mouse button and choose Break.
Breakpoints have three states, as indicated by the button to the left of the source line:
| State | Button |
|---|---|
| enabled | [!] |
| disabled | [.] |
| cleared (non-existent) | [ ] |
The same buttons also appear in the Assembly window and the Break window to indicate the state of a breakpoint.
Clearing, disabling, and enabling breakpoints
Choosing Toggle from the Break menu (F9) toggles between the three different breakpoint states:
- enabled
- disabled
- cleared (non-existent)
Break menu
You can use the Break menu to control your breakpoints. Operations including creating new breakpoints, changing a breakpoint's state, and viewing a list of all breakpoints:
- Toggle
-
Change the state of the breakpoint at the current line in the source
or assembly window. The state alternates between
enabled, disabled, and cleared. The button on the source or assembly
line is updated to reflect the state of the breakpoint.
Disabled and cleared breakpoints aren't the same. If you disable a breakpoint, you can re-enable it and retain the information about the breakpoint (for example, conditions, countdown, and actions). When you clear a breakpoint, you lose all information about the breakpoint. If you disable a breakpoint, and press F9 twice to enable, you lose the information about the breakpoint because you cleared it before you re-enabled it. To enable a disabled breakpoint without losing the breakpoint information, use the Breakpoint Option dialog or the Breakpoint window. - At Cursor
- Set a breakpoint at the current line in the source or assembly window. If the current line doesn't contain any executable code, the breakpoint is set on the closest preceding line of code that does contain executable code. When you choose At Cursor, the Breakpoint dialog appears.
- New
- This allows you to create any type of breakpoint using The Breakpoint dialog. You must specify the address in the dialog.
- View All
- Open the breakpoint window. This window shows a list of all breakpoints. You can use the window to create, delete, and modify breakpoints.
- Clear All
- Clear all breakpoints.
- Disable All
- Disable all breakpoints, but don't delete them.
- Enable All
- Enable all breakpoints that are disabled.
- Save
- Save all breakpoint information to a file. This is useful when you are creating complicated breakpoints. You can save and restore them in a later debugging session.
- Restore
- Restore a set of breakpoints that were saved by using the Save from this menu.
Break window
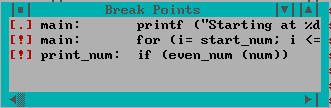
The Break window displays each breakpoint and its state. It appears when you select the View All from the Break menu. A breakpoint button appears at the left of each line. You can click on this button to enable and disable a breakpoint. Unlike the source and assembly windows, the button doesn't clear the breakpoint. Next appears the address of the breakpoint. Finally, for break-on-execute breakpoints, the source or assembly code at the breakpoint location is displayed. For break-on-write breakpoints, the current value of the location is displayed in hex.
To modify any breakpoint, double-click on it, or by cursor to it and press Enter. The Breakpoint Options dialog appears. Press the right mouse button to access the following popup menu items:
- Modify
- Change the definition of the selected breakpoint. The Breakpoint dialog appears.
- New
- Add a new breakpoint. An empty Breakpoint dialog appears. You must specify the address of the new Breakpoint. Refer to the section “ Breakpoint Dialog” for a description of the items that appear in the dialog.
- Delete
- Delete the selected breakpoint.
- Enable
- Enable the selected breakpoint.
- Disable
- Disable the selected breakpoint.
- Source
- Display the source code associated with the breakpoint. This operation only makes sense for break-on-execute breakpoints.
- Assembly
- Display the assembly code associated with the selected line. This operation makes sense only for break-on-execute breakpoints.
Breakpoint dialog
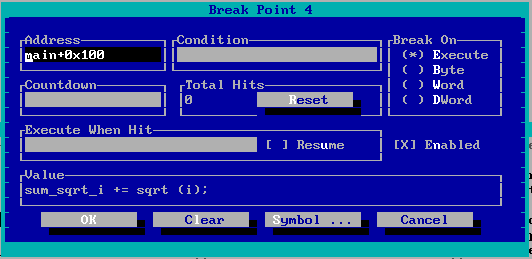
The Breakpoint dialog appears when you:
- select At Cursor from the Break menu
- select New from the Break menu
- attempt to modify a breakpoint
It allows you to define the breakpoint and set all of its conditions. A description of the items in the dialog follows.
- Address
-
This edit field displays the address tag associated with the selected
breakpoint.
When you choose At Cursor, this field already contains an address that describes the line of code that the cursor is on. The format of the address tag is symbol+offset, where symbol is the name of the nearest function, and offset is the distance in bytes past that symbol where the breakpoint is defined. It's normally best not to edit this field. To change the line of source code, leave the dialog, move the cursor to where you want the breakpoint, and use the At Cursor command again.
When you choose New, this field is empty. You can type any valid address expression in this field. It can be the name of a function or a global variable. Refer to the Expression Handling chapter for more information about address expressions. In the dialog, you can click the Symbols... button as a shortcut. You can type a partial symbol, such as foo, and the Symbol button shows you a list of symbols that start with foo. You can then choose one of these symbols by clicking on it, or by pressing Enter. Note that the first time you use the Symbols... button in a debugging session, it may take a while, as the debugger sorts the symbol table for the program.
Be careful when using local (stack) variables for a break-on-write breakpoint. As soon as execution leaves the scope of the variable, the memory changes at random since the variable doesn't really exist any more and the memory is used for other variables. Also, if execution enters that variable's scope again, the variable may not have the same memory address. - Condition
- Use this field to enter a condition that must be met before a breakpoint is triggered. The condition can be an arbitrary debugger expression. These include statements in the language you are debugging. A valid example for the C language is i == 1.
- Break on Execute
- Check this field to create a break-on-execute breakpoint. If you choose Execute, be sure that the address field contains a code address (function name or code line number) and not a variable address. Variables are never executed; if the address field names a variable, the breakpoint will never be triggered.
- Break on Byte/Word/Dword
-
Check one of these fields to create break-on-write breakpoints.
If you choose one of these options,
be sure that the Address field contains a variable address and not a code
address. A code address is never written to, so the breakpoint will
never be triggered. The size of the memory location is defined by the
checkbox you use as follows:
- Byte
- The breakpoint is triggered only when the first byte of the memory address is written to.
- Word
- The breakpoint is triggered when either of the first two bytes at the memory address is written to.
- Dword
- The breakpoint is triggered if any of the first four bytes of the memory address is written to.
- Countdown
- Use this field to enter the number of times an address must be hit before the breakpoint is triggered. Every time the breakpoint conditions are met, the countdown decreases by one. The breakpoint is triggered only after the countdown is at zero. Once the countdown reaches zero, the breakpoint is triggered each time the conditions are met. If you have also set a condition, the countdown decreases by one only when the condition is true.
- Total Hits
- This field displays the total number of times an address has been hit. This includes the times the breakpoint isn't triggered because a condition failed or the countdown hasn't yet hit zero.
- Reset
- Click on this button to reset the Total Hits field to zero.
- Execute when Hit
-
Use this field to enter a debugger command. When the breakpoint is
triggered, the debugger executes this command. You can use this
field to execute arbitrary C statements, change a variable or register,
or even set other breakpoints. For a more detailed description of
commands that can be entered in this field, refer
to Appendix A: Debugger Commands.
If you want to use this field to execute a statement in the language you're debugging, you need to use a DO command in front of the statement. For example, you could enter DO i = 10 to have the value of 10 assigned to i each time the breakpoint is triggered.
- Resume
- Check this field if you want the program to resume execution after the Execute when Hit command has been completed. This capability can be used to patch your code.
- Enabled
- This field displays the current state of the breakpoint. If it is checked, the breakpoint is enabled. If it is unchecked, the breakpoint is disabled.
- Value
- For Break-on-Execute breakpoints this field displays the source line or the assembly line at which the breakpoint is defined. For Break-on-Write breakpoints, this field displays the memory contents.
- Clear
- Click on the clear button to clear the breakpoint and close the dialog.